The Flying Battleship Balrog (空中戦艦バルログ) is the fourth stage in Strider 2, an updated rendition of the original stage with references to other stages mixed in, like Siberia's airship section. The stage's official full name is "Pursue the Flying Battleship Balrog" (空中戦艦追撃, lit. Chase the Flying Battleship).
Story[]

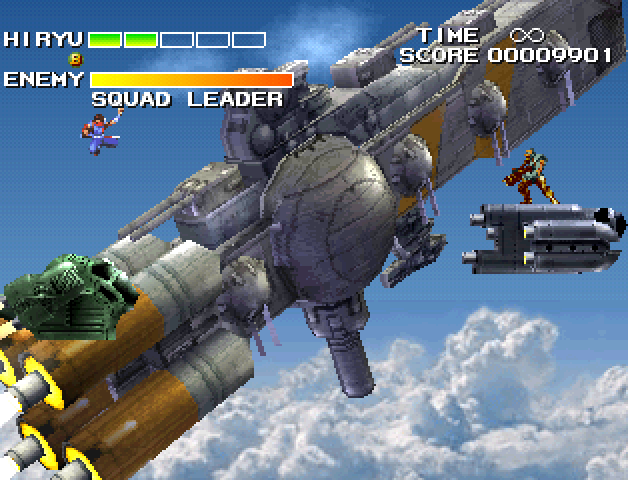
The Balrog in mid-flight
An upgraded version of the original Balrog build by Light Sword Cypher, classified as a "super-dreadnought" class warship that rules Earth from the stratosphere[4]. The large warship is capable of flying by using the mysterious force generated by a Merrow, an aquatic mermaid-like creature trapped within the ship's Reactor Core[1]. Its crew consists of Infantry soldiers wielding Dual Linear Guns, an unit of enhanced Superhumans and the ship's captain, Admiral Wilhelm. There's also an entire division devoted to the development of weaponry and other machines, overseen by The Professor.
Provided with more advanced technology, as well as better weaponry and defense systems, this warship is boasted as the "greatest threat produced by mankind"[4], with enough power to instantly reduce an entire city into ashes[5]. It is, however, not the only one of its kind, with atleast three other models docked at the Third Moon's spaceport. These seemingly "mass-produced" variants are visually identical to the main Balrog, except their front is colored green instead of red.
Hiryu is able to track down the ship following his assault on the Antarctica Research Lab, in an intentional effort to force the unknown powers ruling the world to reveal themselves[6]. Reaching the warship mid-flight with his Glider, Hiryu maneuvers through its airship escort before infiltrating the warship itself. Eventually reaching and destroying the ship's core, this initiates the Balrog's self-destruction. He then makes his escape through the ship's port, reaching Wilhelm's Catapult escape ship just as it's about to leave. After a violent battle, Hiryu eliminates Wilhelm and uses his ship to reach the Third Moon.
Layout[]
Battleship Balrog Warning Airspace (戦艦バルログ警戒空域)
Known as "In the skies of Equator Malay Island" in the English script.
The airspace surrounding the Flying Battleship, which is accompanied by a squad of smaller "Flying Tortoise" airships. Hiryu reaches this area using his Glider, and advances by jumping from airship to airship, facing off against the Balrog's marine force along the way. Eventually, Hiryu faces off against the Squad Leader and, after taking care of him, uses his airship to reach the Balrog.
Battleship Balrog Tail's Exterior (戦艦バルログ尾部外殻)
Known as "Outside the tail of Flying Battleship Balrog" in the English script.
Against the strong winds of the ascending ship, Hiryu climbs his way through this upstart area. The exterior of the ship is well protected with turrets and floating mines, as well as marines using plasma rifles. Midway through the area, there's a takeoff platform: going beneath it has Hiryu face a corridor filled with turrets and laser emitters, while going through the platform itself leads to a Fighter aircraft about to fly away. Following ahead of this area, Hiryu eventually reaches the source of the floating mines: the Minelayer machine. After destroying it, he finds his way inside the ship.
Engine Room: Power Transformer Section (機関室 動力トランス部)
Known as "The gravity transformer of the engine room" in the English script.
A secluded chamber within the Balrog, this is the location of the Scarabee. The room is square-shaped, with two small square platforms in the upper area. The Scarabee moves along the edges of the room, attacking with several different electric attacks, while slow electric spheres move around the platforms' surfaces.
Development Dock (開発ドック)
Known as "The development dock area" in the English script.
A massive room with a large three-tiered scaffolding surrounding a large machine known as "Goliath", lying across the room's length. The Professor and his assistants develop weapons and machines in this area. As Hiryu traverse the scaffolding he's faced by enemy soldiers while the assistants attempt to stop him by forging metal walls. Hiryu dashes through the area, taking care of every enemy until he reaches the top floor. After clearing up a long chasm Hiryu reaches the Goliath's chest, equipped with a multi-emitting laser battery in the vein of the original Novo. After its destruction, there's a small corridor and a door leading to the Reactor Core.
Central Engine Room Reactor Core Section (中央動力室炉心部)
Known as "The central engine room" in the English script.
The ship's power source and means of flying. The chamber is circular and in constant movement, with the core hanging from the ceiling in its center. Two yellow platforms at either side are the only means to reach it. The core itself is a crystal with a female Merrow trapped inside, who upon seeing Hiryu pleads with him to kill her. The core can defend itself by shooting out electric pulses or releasing a giant beam of energy. Once it is destroyed, the whole ship starts to self-destruct.
Catapult Escape Ship (脱出艇カタパルト)
Known as "The satellite escape ship" in the English script.
Located in the ship's hull, it's a port holding several escape ships called "Catapults"[7], because they are propelled off the ship by special catapults. Outrunning the fire and explosions from the Balrog's destruction, Hiryu makes a run through this area, getting past a crumbling ship and taking out any enemy still in his path, before reaching the final escape ship. Here Hiryu and Admiral Wilhelm meet in battle, and once Hiryu defeats him, he takes control of the ship to reach Grandmaster Meio's orbital base, The Third Moon.
Stage Enemies[]
Enemies present in this stage include:
- Infantry (Scenes 1 and 6)
- Solo Mass Produced Model (Scene 1)
- Squad Leader (Scene 1 Boss)
- Turret (Scene 2)
- Laser Turret (Scenes 2 and 6)
- Plasma Cannon Soldier (Scene 2)
- Fighter aircraft (Scene 2)
- Minelayer (Scene 2 Boss)
- Scarabee (Scene 3 Boss)
- The Professor & Assistants (Scene 4)
- Infantry Turbo (Scenes 4 and 6)
- Assassin Unit (Scene 4)
- Goliath (Scene 4 Boss)
- Reactor Core (Scene 5 Boss)
- Unnamed Flying Turret (Scene 6)
- Admiral Wilhelm (Scene 6 Boss)
Hidden Items[]
A listing of locations for all known hidden Score Up items in this stage.
| Scene 1 Locations | ||
|---|---|---|
| Order | Hidden Item | Information |
| #1 |  |
Reach the third Flying Tortoise at the start which is floating slightly above the rest. Jump into the next platform (there's an Item Box), from here there are 5 more platforms to the right. The 5th Flying Tortoise will perform a dive as soon as Hiryu lands on it, so jump out of it quickly to reach the last platform. This platform will fly upwards to reveal another path of Tortoises, where each one has an Item Box in them. Be careful not to fall off as the game will respawn Hiryu in the lower platforms. |
| #2 |  | |
| #3 |  | |
| Scene 2 Locations | ||
|---|---|---|
| Order | Hidden Item | Information |
| #1 |  |
Jump into the platform used by the Fighter aircraft and move right a few steps, use the background platform as a guide and stand in front of it, then perform a Double Jump upwards and strike at the left. This one is hard to pinpoint correctly. |
| #2 |  |
Reach the Minelayer boss, jump into its platform and perform a Double Jump then strike at the area where the score and time are displayed, the item is hidden just in the middle of the text. |
| Scene 4 Locations | ||
|---|---|---|
| Order | Hidden Item | Information |
| #1 | |
Jump against the wall left of the starting point and strike at the apex of the jump. |
| #2 |  |
Within the scaffolding, reach the first dead end (there's an Item Box) and strike at the top corner. |
| #3 | |
At the top of the scaffolding, climb to the ceiling next to the Assistants and perform a Hassou Jump left, striking as Hiryu flies by to reveal the item. |
| #4 | |
Around the center of the gap before the Goliath boss. Climb down the left wall and perform Hassou Jumps or Double Jumps right, striking roughly above the first line on the robot's gray joint visible in the background. |
| #5 | |
There's an Item Box floating at the top of the last part, right above The Professor. |
| #6 |  |
Inside the door behind The Professor, strike inside it to reveal the item. Avoid killing the Professor to prevent the stage from ending or go past him by slashing while running so as to kill him and then automatically reveal and pick the item. |
| Scene 5 Locations | ||
|---|---|---|
| Order | Hidden Item | Information |
| #1-2 | |
Strike the lower area at both sides of the platform in the middle of the stage to reveal an item in each. |
| #3 | |
Found far away at the top left side of the screen. Await for the yellow platform to come the closest to the left side then jump and strike the space high above. The item is roughly at the same level as the top metallic part of the Reactor Core. |
| #4 | |
Same as above, only at the right side instead. |
| Scene 6 Locations | ||
|---|---|---|
| Order | Hidden Item | Information |
| #1 | |
There's an Item Box floating below the left wing of the broken Catapult airship. Climb down quickly to grab the item as this part breaks down and falls shortly after reaching it. |
Gallery[]
")
")
")
")
")
")
")
")
References[]
- ↑ 1.0 1.1 Capcom (February 22, 2014). Strider Hiryu Visual Chronicle (Japanese). Pg. 43
- ↑ Capcom (February 2000, PlayStation). Strider Hiryû 1&2 (Japanese). Mission 4: Chasing the Flying Battleship; Scene 1: Over the skies of Malay Archipielago in the Equator. Battleship Balrog Warning Area
- ↑ Capcom (February 2000, PlayStation). Strider Hiryû 1&2 (Japanese). Mission 4: Chasing the Flying Battleship; Scene 5: Above Satellite Orbit. Catapult Escape Ship
- ↑ 4.0 4.1 Capcom (December 13, 1999; Arcade). Strider Hiryu 2 (Japanese). Stage 4 Briefing
- ↑ Staff (Autumn 1999). "Strider Hiryû 2". CFC Style Fan-Book CAP! (11). Pg. 4
- ↑ Capcom (September 1999). JAMMA AM Show Game Flyer (English).
- ↑ Yamamoto, Setsuo and Yoneda, Etsuko (January 21, 2000). Strider Hiryû 2 Original Soundtrack. [CD]. Suleputer, CPCA-1035. Liner Notes, pg. 3.